
Test Results and Conclusion
This is the last article in the series where we have discussed how to use NFV (Network Functions Virtualization) to secure your network and react promptly to security threats such as DDoS attacks.
Before revealing the results of our PoC (proof of concept) lab, let’s quickly review what we have discussed through the first three articles…
In the First Article, we highlighted the problem statement: many networks are under serious threat of being confronted with an advanced DDoS attack, Threat probability and expected impact increased exponentially due to the rapid increase in number of connected devices to the Internet (e.g. IoT, and Drones). Then we discussed the requirements and goals which can be summarized as follows
Requirements:
- Use NFV to mitigate the risk of DDoS attack.
- Provide results and graphs for DDoS attacks on a simulated network protected via NFV setup.
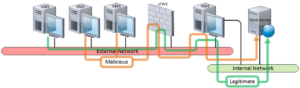
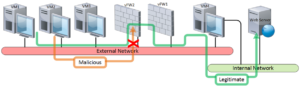
- Testbed includes two production networks plus a management/monitoring network
Goals:
- Detecting DDoS attack as soon as possible to protect organization’s assets.
- Elasticity: the ability to scale-up and scale-down network and servers’ resources.
- Mitigating and blocking DDoS attack using NFV and security tools.
- Stopping illegitimate (DDoS) traffic, while minimizing the effect on legitimate (normal) users.
Next in the Second Article, we explained the proposed Architecture and Design Considerations utilizing the overall ecosystem developed by ETSI for NFV
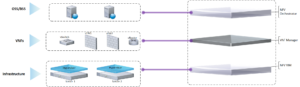
Our Simulation Lab
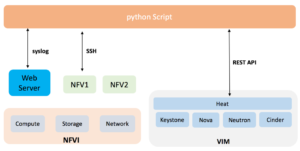
After that in the Third Article, we covered Test Methodology where the whole setup is managed using OpenStack.
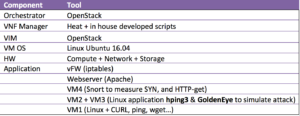
Test Tools we have used to simulate NFV mitigating the risk of DDoS attack are:
Test Cases
- DDoS using SYN flood
- DDoS using HTTP-Get flood
Before Mitigation
After Mitigation
Test Results
DDoS attack using SYN flood
To simulate DDoS attack, we have used two VMs as malicious attackers (VM2, and VM3).These two VMs initiated the attack By Simulating a DDoS SYN attack using HPING3 tool running no those two VMs. During this attack VM1 (simulating legitimate user) was trying to access the webserver.
First Run of our test we disabled the mitigation in our solution, and allow the DDoS attack to continue in order to capture the effect on webserver resources, and legitimate users.
Below are the results of the test without mitigation:
- Webserver CPU Utilization reaches 100% within 2 minutes
- Legitimate user wasn’t able to access the webserver
- Ping increased from 2 msec in normal situation to 40 msec while the webserver is under attack
- user couldn’t download any file from webserver (test was done using Linux wget -p command)

Second run we enabled mitigation and stopped DDoS attack after reaching the configured threshold on webserver resources.
Below are the results of the test with mitigation:
- Once Webserver CPU Utilization reaches the defined threshold (70% in our case), additional resources have been added to webserver (Scale up to the webserver resources by increasing its CPU from 1 vCPU to 2 vCPU and its RAM from 1G to 2G).
- After identifying attack types (using SNORT) the attack was stopped automatically via the python script, which was pushed to the newly spin-off firewall using our NFV solution. This stopped only the malicious sources sending the attack while allowing the legitimate users.
- Legitimate user was able to access the webserver normally:
- Ping result is the same figure as normal situation 2 msec.
- user was able to download the files smoothly from webserver (test was done using Linux wget -p command).
- Attack was stopped in less than 5 minutes.

To compare the two test runs, and how effective is NFV mitigation solution; below diagram is a sample of the effect on webserver CPU with and without mitigation.

DDoS attack using HTTP-Get flood
To simulate DDoS attack, we have used to VMs as malicious attackers (VM2, and VM3). These two VMs initiated the attack using BoNeSi and GoldenEye tools. During this attack VM1 (simulating legitimate user) was trying to access the webserver.
First Run of our test we disabled the mitigation and allow the DDoS attack to continue in order to capture the effect on webserver resources, and legitimate users.
Below are the results of the test without mitigation:
- Webserver CPU Utilization reaches 100% within 2 minutes
- Legitimate user wasn’t able to access the webserver
- Ping increased from 2 msec in normal situation to 10 msec while the webserver is under attack
- user was able to download the file from webserver, but it long time to complete downloading a tiny file – size around 11 kB (test was done using Linux wget -p command)
Second run we enabled mitigation and stopped DDoS attack after reaching the configured threshold for webserver resources.
Below are the results of the test with mitigation:
- Once Webserver CPU Utilization reaches the defined threshold (70% in our case), additional resources have been added to webserver (Scale up to the webserver resources by increasing its CPU from 1 vCPU to 2 vCPU and its RAM from 1G to 2G).
- After identifying attack types (using SNORT) the attack was stopped automatically via the python script, which was pushed as a firewall rules on the newly inserted Firewall (FW2) our NFV solution. This had stopped only the malicious sources sending the attack while allowing the legitimate users.
- Legitimate user was able to access the webserver normally:
- Ping result is the same figure as normal situation 2 msec.
- user was able to download the files smoothly from webserver (test was done using Linux wget -p command).
- Attack was stopped in less than 4 minutes.

To compare the two test runs, and how effective is NFV mitigation solution; below diagram is a sample of the effect on webserver CPU with and without mitigation.

Conclusion
In this series of articles, we tried to outline the effectiveness of NFV solution to mitigate DDoS attacks. To simulate that we graph some KPIs that was collected from the web server (such as CPU, Memory, and Traffic Rate) before the attack, during the attack, and how the solution mitigated the DDoS attack.
The below graph outlines the CPU utilization for the Web server during the testing period

As per the above graph the overall process from detecting the attack and scaling the resources till mitigating the attack took around 5 minutes which is good number. Further, it didn’t involve any human interaction and it was fully automated.


Beautiful